摘自:www.teachtutorials.com/
Part I
Photo Effect.
Part II
Gif Animation.
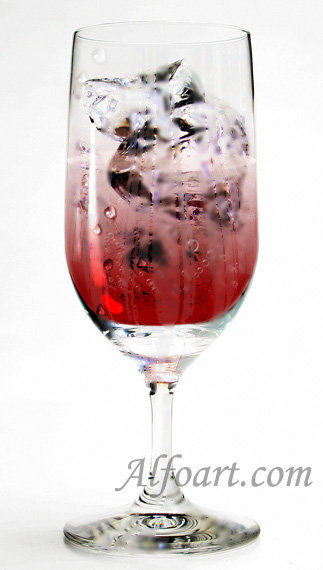
Glass of cold sparkling drink. Open image of a glass. Right Click on Layer, select Layer from background > Ok.

Select the Glass, using Magnetic Lasso Tool. Click on Quick Mask, correct the selected area, using black and white brushes one by one.


Fill the selected area with Gradient (Red/Transparent) in a new layer.

Adjust Overlay Blending Mode for the Layer with gradient.

Select part of the glass which is supposed to be filled in with drink and create a new layer.
- Fill it with red/transparent gradient again.
- Adjust Linear Burn Blending Mode for the Layer with gradient.
- Create Oval selection in the new layer.
- Fill it with light pink color.
- Adjust Screen Blending Mode.
- Opacity 85%.
- Add Vector Mask.
- Erase some parts of ice in Vector Mask.
- Create a new Layer.
- Adjust Overlay Blending Mode.
- Click on Quick Mask.
- Draw two spots of sunlight.
- Click on Quick Mask again.
- Select > Inverse.
- Select > Refine edge.
Transform sunlight spots.
- Edit > Transform > Warp Transform
Creation of a bubble brush.
- Draw a circle using Elliptical Marquee Tool.
- Create a new layer.
- Fill it with white color.
- Right click on the layer with circle, select Blending Options.
- Adjust Drop Shadow.


- Make strokes in the new layer, using soft brush.
- Choose Filter > Blur >Gaussian Blur.

- Choose Edit > Define brush Preset.
- Name the brush, and click OK.

Set painting options
- Select Brush Tip Shape on the left side of the Brushes palette, and set options just like in the examples below.


- Create a new Layer.
- Adjust Vivid Light Blending Mode for the Layer.
- Draw Bubbles using white color.

Creation of Dewy glass effect.
- Select the Glass
- Fill it with Black color in a new layer!
- Choose Filter Texture > Grain.
- Filter/Artistic > Smudge stick (0, 11, 10).
- Filter > Blur > Gaussian blur -(radius 1,5).
- Filter > Blur > Motion blur (90, 10).
- Image > Adjustments > Levels.
- Choose Filter > Liquify filter . Correct the form of stripes.
- Select > Color Range.
- Select black color.
Duplicate the Glass layer.
Adjustments for the duplicated layer:
- Choose Filter > Noise > Add Noise.

- Choose Filter > Blur Gaussian Blur (15-25).
- Choose Image > Adjustments > Hue/ Saturation.
Erase some parts of condensate and correct it in Liquify Filter again.
Creation of water drops.
- Create a new layer.
- Create elliptical selection using Elliptical Marquee Tool.
- Fill it with Gradient (black/white)
Right click on the Drop layer, select Blending options. Adjust Blending Options, just like in the examples below.


- Draw light spots using white brush.
- Copy and paste the layer with the drops several times.
- Transform and move each layer.

- Correct the form of drops in Liquify Filter.
And here is the result!
Part II. Animation Effect.
- Open the image of the glass without drink.
- Activate Animation Palette. Window > Animation.
- Choose Layer > Video Layers > New Blank Video Layer.

- Open the image of the glass with drink in new document.
- Activate Clone Source. Window > Clone Source.
- Choose Clone Stamp Tool.
- Alt + Click on the image of the glass with drink.
- Return to the empty glass document (New Video Layer2).
- Choose Clone Stamp and Combine two images (Adjustments of Clone Source: Show Overlay and Opacity 25%)

- Click on Show Overlay after combining.

- Go to Animation Panel and apply Clone Stamp from below to the top in each frame. Switch frames using Select Next Frame button or move the current-time indicator to the next frame.
- Click the Toggle Onion Skins button to enable onion skinning.


- Create a new video layer for the bubbles. Draw the bubbles changing their location in each frame.


- Add the bubbles over the liquid in each frame.
- Select all layers.
- Go to Animation Menu > Flatten Frames into layers.
- Select Frames, go to Animation Menu > Make Frames From Layers.
- Animation Menu > Optimize Animation, click Ok.

- File > Save For Web & Devices
- Select optimization options and preview optimized artwork.
- Preset: Gif, Looping options: Forever. Click Save.
- Adjust Overlay Blending Mode for the Layer with gradient
- Flatten Image. Now you have only Glass layer!!